


Looking for a way to achieve glowing skin without the hefty price tag of professional chemical peels? A DIY chemical peel might be your new skincare best friend.
Especially during cold weather, when dry skin, dull skin, and moisture loss are common, at home peels using readily available ingredients can help remove dead skin cells and reveal a brighter skin tone. These home peels offer a cost effective peel solution to enhance your beauty routine right from the comfort of your bathroom.

While clinical chemical peels offer deep exfoliation in a clinical setting, many users find DIY home peels to be a gentler, safer alternative for regular use.
With growing concerns about acid concentration, chemical burns, and consumer safety especially with some products sold on retail platforms like Amazon and Walmart it’s no surprise that at-home peel safety is top of mind.
Just be sure to choose natural face peel options designed to improve acne scars, fine lines, wrinkles, and enlarged pores without risking irritation or disfigurement.
Are Natural Peels Effective for Acne Scars?
Acne scars can vary widely from mild acne scars to moderate acne scars, and even severe acne scars but one thing is certain: they can deeply affect your self-confidence. If you’ve dealt with breakouts that left behind visible skin damage, you may be looking for a solution that doesn’t involve lasers or harsh treatments.
That’s where natural peel suitability comes into play. While not a miracle fix for every scar type, many people find facial peel effectiveness in treating acne scarring, especially when the marks are shallow or recent.
A natural peel for scarring can help reduce scar appearance, particularly when used consistently as part of a broader scar treatment method.

That said, natural peels are not suitable for all scars especially deep, pitted, or keloid scars. Understanding your acne scar types and scar severity will help determine if a natural acne scar peel is the right choice to eliminate acne scars or simply reduce their visibility over time.
Still using Vaseline? Find out if it’s clogging your pores or saving your skin. Read now.
Benefits of Natural Peels for Acne Scars
One of the biggest advantages of using a natural acne scar peel is that it reduces inflammation, calming the skin and preventing further irritation. Many formulas provide immediate redness relief and can also help with itch reduction and discomfort relief particularly for those with reactive or acne-prone skin.
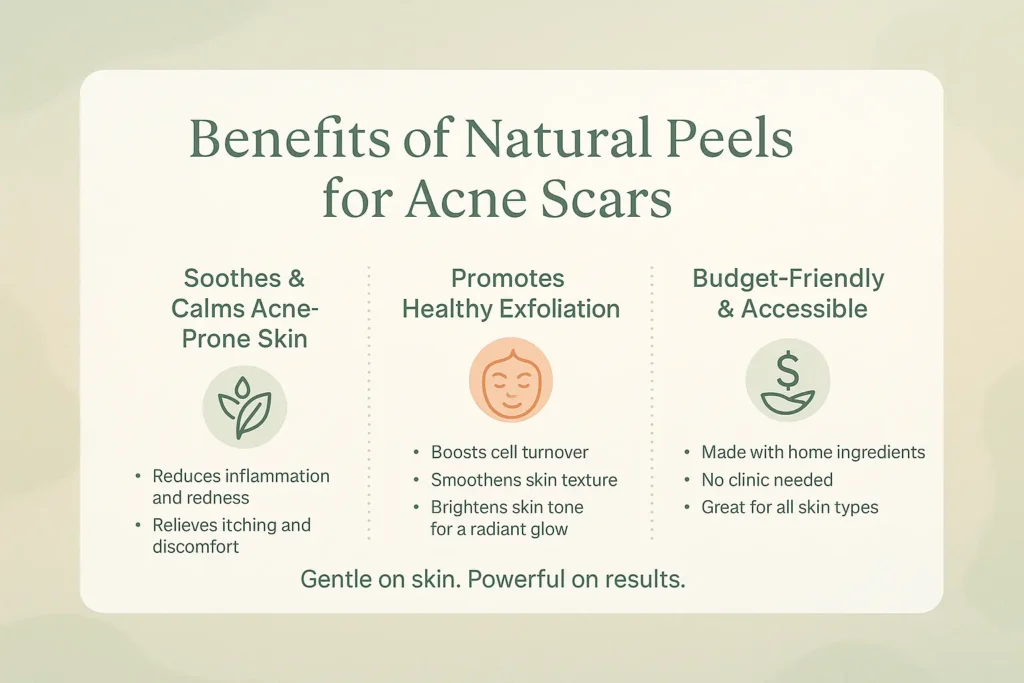
Beyond calming benefits, natural peels are highly effective for gentle exfoliation, helping to promote cell turnover and reveal smoother skin over time. This process leads to improved skin tone, a brighter complexion, and overall radiant skin that feels fresh and rejuvenated.
These peels also deliver long-term benefits, such as healthy skin renewal and improved skin texture all without the cost of a clinic visit. Since many recipes are made from ingredients you already have at home, they’re also an easy-to-make peel option that fits into any routine.
Better still, they’re a form of inexpensive skincare that works for a wide range of people looking for a safe natural peel with real acne scar benefits.
4 Natural Peel Recipes You Can Try at Home
Looking for effective DIY peel application ideas? These homemade peel options combine powerful ingredients with natural goodness to help brighten skin, fade spots, and support a healthier complexion all while being gentle enough for most skin types.
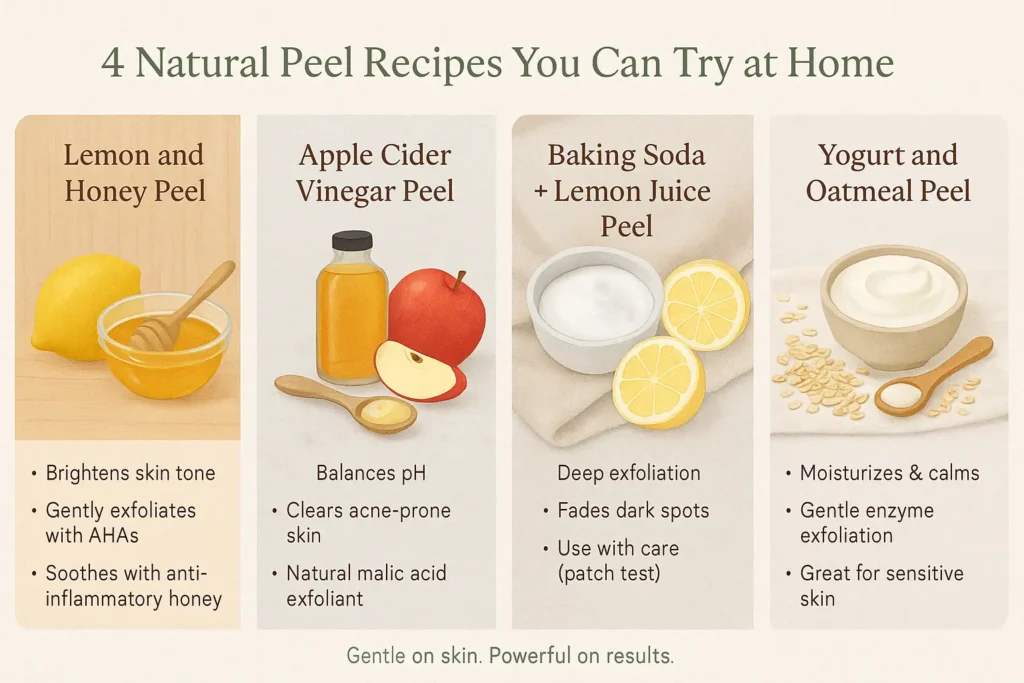
1. Lemon and Honey Peel
This classic combo features the skin lightening effects of lemon (rich in alpha-hydroxy acids) and the anti-inflammatory properties of organic honey. Together, they exfoliate and soothe your skin while promoting an even tone. Just be sure to rinse with cold water and avoid sunlight right after use.
2. Apple Cider Vinegar Peel
An apple cider vinegar peel offers natural malic acid that gently dissolves dead skin and helps with pH balancing. Mix with apple sauce paste to thicken the formula and keep it from dripping. Ideal for acne prone skin types.
3. Baking Soda and Lemon Juice Peel
For a deeper cleanse, a baking soda and lemon juice peel can do wonders. The baking soda scrub exfoliates while lemon helps with skin lightening. It’s potent, so test on a small area first.
4. Yogurt and Oatmeal Peel
This calming, moisturizing peel features the probiotic benefits of yogurt and the oatmeal exfoliant effect of ground oats. Use greek yogurt for a thick texture that stays in place. This is a great option for natural enzyme exfoliation and post-sun recovery.
Each face peel recipe here is affordable, easy, and designed to rejuvenate your skin using the best nature has to offer.
At-Home vs. In-Clinic Peels: Which One Is Right for You?
When it comes to exfoliating treatments, you’ve got options: at home natural peels and in-clinic chemical peels. Each has its own benefits and considerations.
Understanding the Ingredients
At home peels usually use gentle AHAs (alpha-hydroxy acids) or BHAs (beta-hydroxy acids) such as glycolic acid, lactic acid, citric acid, mandelic acid, or salicylic acid. These ingredients target acne scar reduction, blocked pores, uneven skin tone, and dry skin treatment. Most mild chemical peels fall into this category.
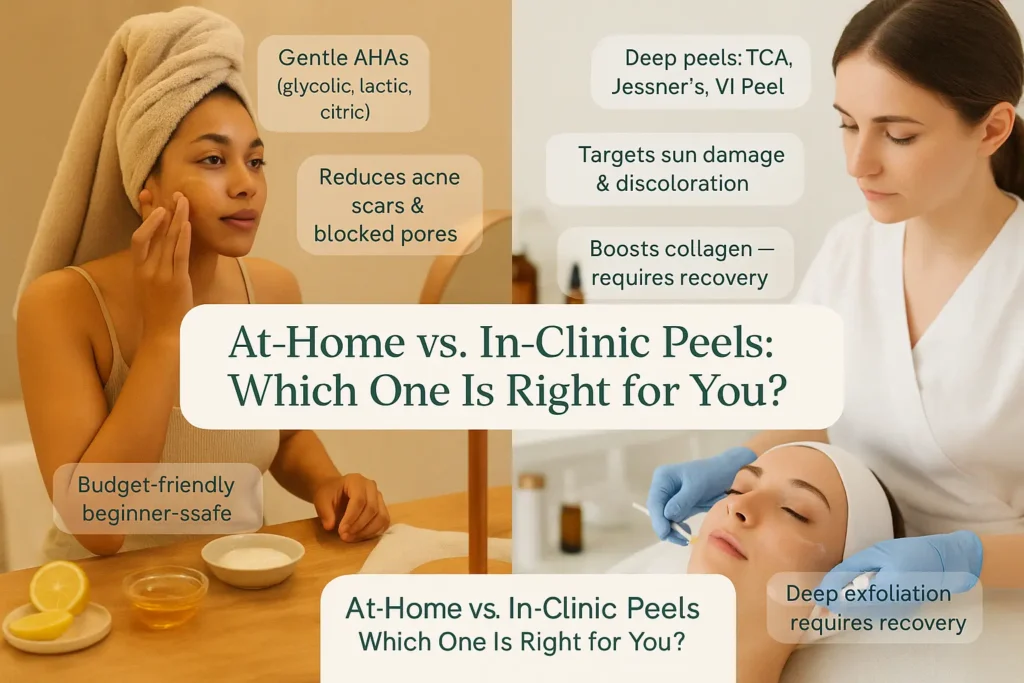
On the other hand, in-clinic peels often include Jessner’s Peel, TCA peel (trichloroacetic acid), phenol, and newer formulations like the VI Peel. These penetrate deeper, making them suitable for medium depth peels or even deep chemical peels aimed at more intense concerns like sun damage, discoloration treatment, and skin imperfections.
Professional Supervision vs. Home Convenience
In-clinic supervision ensures that high strength acids like retinoic acid (a vitamin A derivative) are used safely. These treatments often boost collagen production, improve skin cell turnover, and control sebum, but they also come with recovery side effects.
In contrast, acid blend treatments done at home are safer for beginners and more affordable just remember that they’re not for all skin types, especially very sensitive or compromised skin.
Worried Celsius might cause breakouts? Get the facts before your next sip. Learn more.
DIY Chemical Peel for Dry Skin: The AHA Solution
If you struggle with itchy skin relief or irritated skin, try this deeply hydrating AHA peel designed to gently exfoliate and restore moisture.
What You’ll Need
- 1 tablespoon white cane sugar
- 1 tablespoon plain yogurt
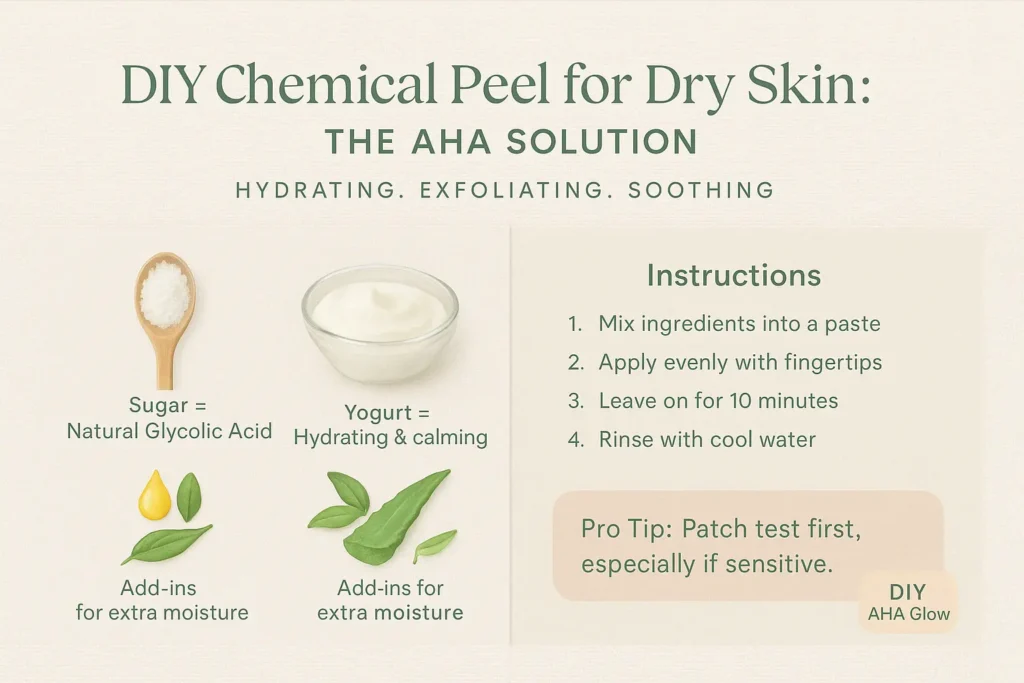
This glycolic acid peel uses the sugar for exfoliation and yogurt for hydration. It’s also an effective dark spot peel and doubles as a nourishing face mask.
How to Use It
Mix into a granulated paste and apply gently. Leave on for 10 minutes, then rinse with cool water. This homemade glycolic peel is perfect for a weekly refresh. Pro tip: apply with your fingertips for an even cane sugar scrub experience your skin will thank you!
Looking for added richness? Use a yogurt face peel variation with a drop of honey or aloe for extra calm.
DIY Chemical Peel for Oily Skin: The BHA Deep Clean
Oily or acne-prone skin needs deeper action. Enter the BHA peel, made from household ingredients with powerful results.
What You’ll Need
- 12 uncoated aspirin tablets
- Juice from ½ lemon (lemon juice acid)
- 1 tbsp baking soda neutralizer
- 1 cup water
The aspirin acts as a salicylic acid source perfect for a chemical peel for sebum control and exfoliate oily skin.
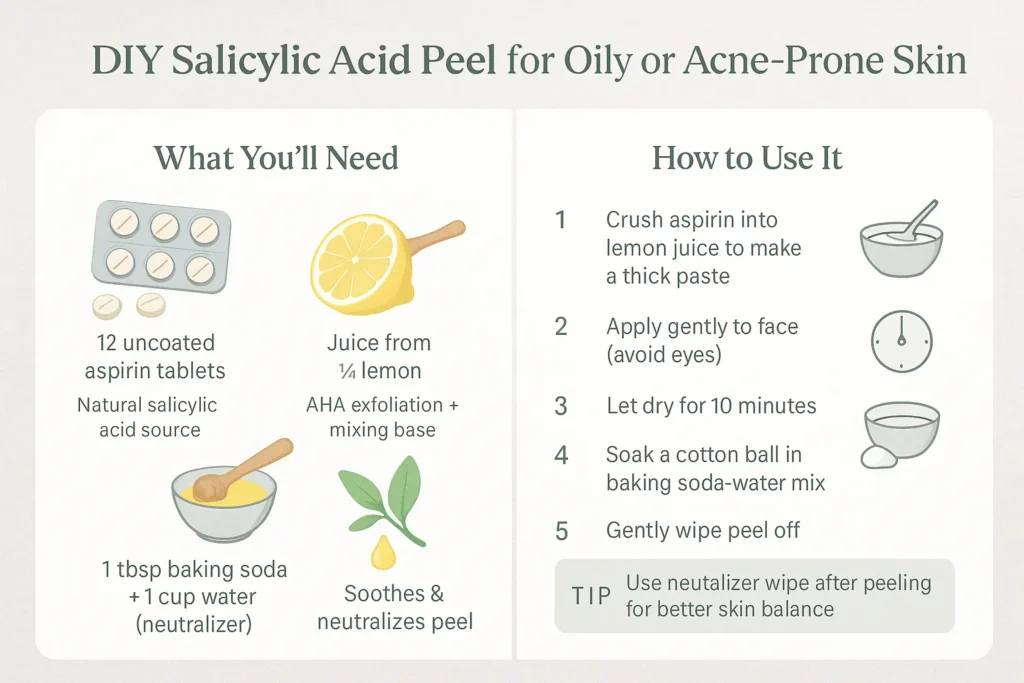
How to Use It
Crush the aspirin into lemon juice to create a thick paste peel, then apply to your face (avoiding eyes). Let dry for 10 minutes. Dip a cotton ball into the baking soda and water mixture to remove it gently. This is your go to homemade oil control peel for breakouts.
Try this as a DIY salicylic peel once a week for improved clarity. It doubles as a powerful oily skin treatment and homemade acne peel for stubborn areas.
Bonus tip: use a cotton ball wipe dipped in the neutralizer for added control and post-peel balance.
DIY Chemical Peel for Sensitive Skin: Soothing Cucumber & Tea
Sensitive skin needs soothing, cooling, and gentle action—which is exactly what this cucumber and tea peel delivers.
What You’ll Need
- 1 green tea for skin (cooled)
- 1 chamomile tea
- 1 small cucumber
- 1 tsp unflavoured gelatin
- 100ml water
Rich in ascorbic acid (vitamin C for skin) and known for its anti-inflammatory peel benefits, this mask calms irritation and reduces redness.
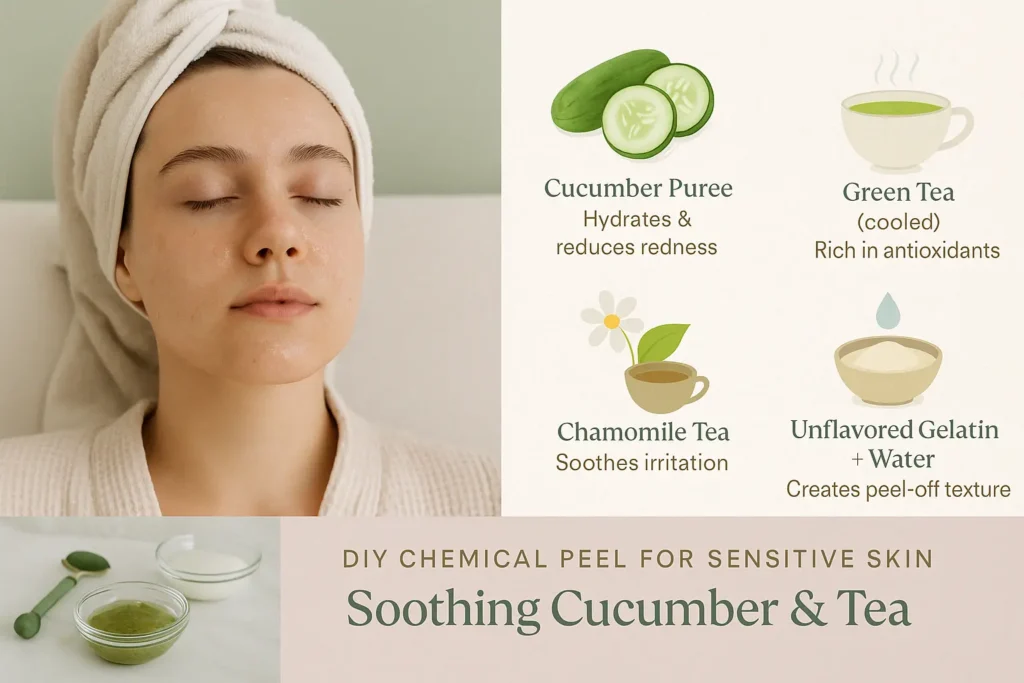
How to Use It
Blend the cucumber into a puree to make a cucumber juice mask. Steep both teas in water, add the gelatin, and mix in the cucumber. Refrigerate the tea infused peel until thick.
Apply, leave for 15–20 minutes, then peel-off mask gently and finish with a warm water rinse. This cooling facial peel is perfect post sun or whenever your skin flares up.
This gelatin-based peel is a true calming natural peel, leaving your skin soft, hydrated, and refreshed. Try it as a weekly tea and cucumber facial it’s spa-quality calm in your own kitchen.
Application & Results Tips for Natural Peels
To get the best natural peel results and avoid unnecessary discomfort it’s important to prep, apply, and treat your skin with care before and after your peel.
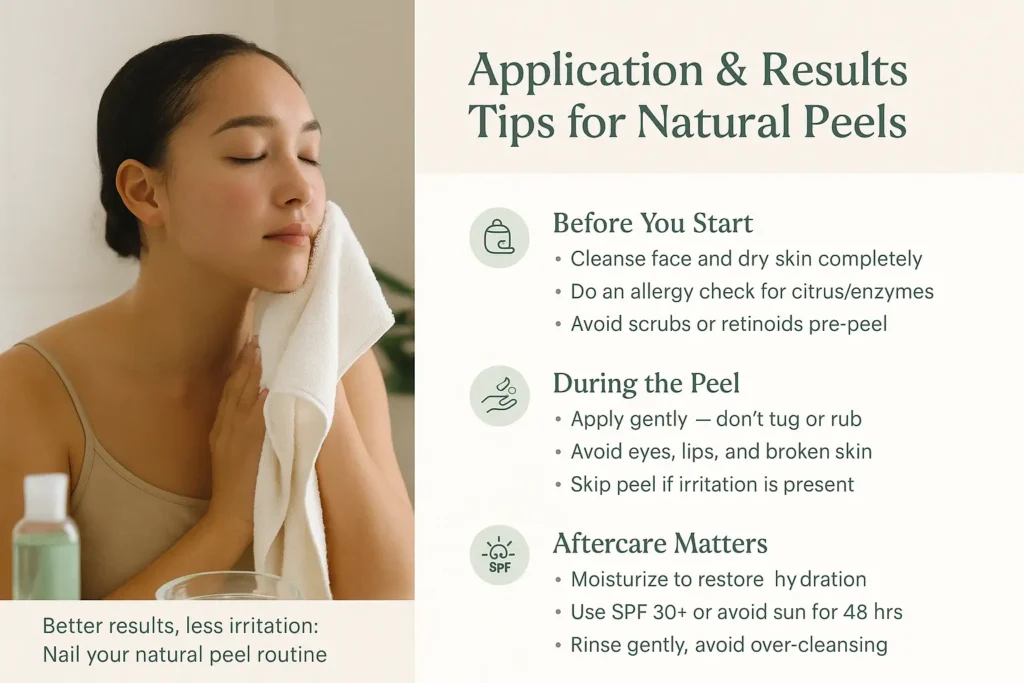
Following these tips ensures proper natural peel care and gives your DIY skincare routine a major boost in both safety and effectiveness.
Side Effects & Frequency of Natural Peels
Even natural peels can come with a few downsides if not used carefully. Here’s what to expect and how to avoid the pitfalls.
Potential Side Effects
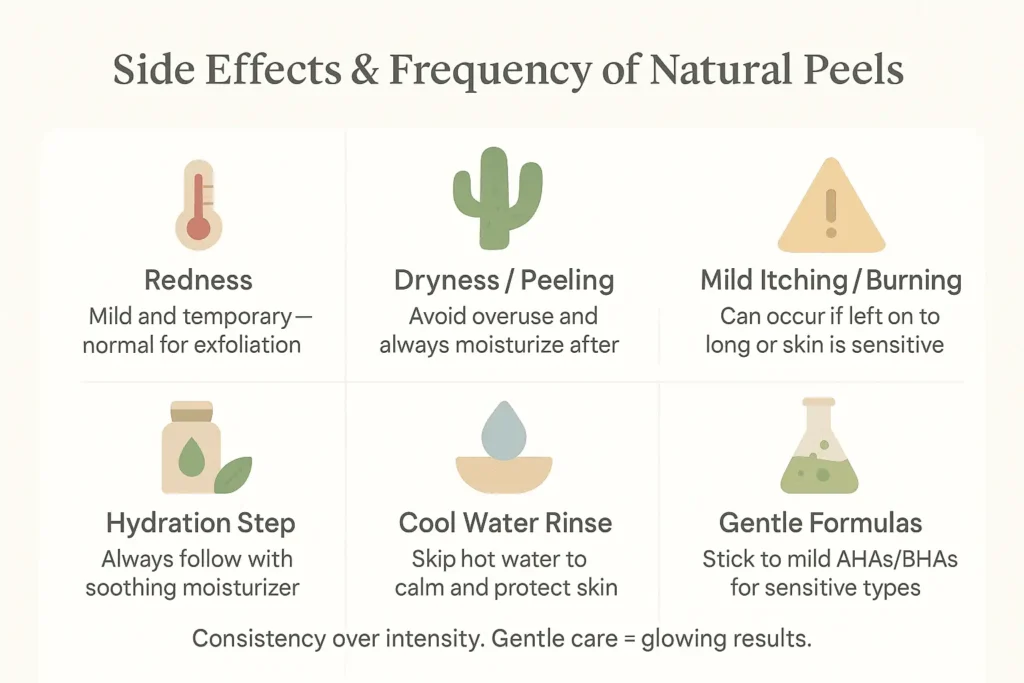
- Redness, dryness, mild itching, and mild burning are common after-effects.
- You might notice peeling, which can be good but overdoing it risks sensitive skin response.
- Be aware of allergic reaction risks, especially if you have known allergic ingredients.
- Always use a cool water rinse and avoid harsh chemicals during and after the process.
Tips to Prevent Irritation
- Apply your peel with a scrub free application method.
- Stick to gentle formulas to soothe irritation and reduce flare-ups.
- Follow every peel with moisturizing aftercare and a hydration step to replenish your skin.
How Often Should You Peel?
- For ideal peel frequency varies start with a weekly natural peel and adjust.
- Consider your skin type variation: sensitive skin limit may be once every 10–14 days.
- Track your desired results and reduce frequency if irritation occurs.
- Stick to a structured natural peel routine with few days gap in between.
- Avoid overuse by following an optimal results schedule and understanding peel spacing.
- Think of it as a gentle treatment interval, not a daily ritual.
When done right, peels can dramatically improve skin texture and tone, without the side effects.
